Animation
PixelOver includes a complete animation workflow based on object tracks and keyframes.
Animations are created and edited from the Animation panel at the bottom of the Project page. They can also be managed, saved, and reused across projects.
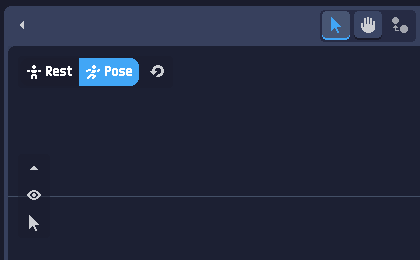
Rest / Pose workflow
PixelOver uses two editing modes:
- Rest mode: edit the default (global) values of objects
- Pose mode: edit values for the currently active animation only
The Rest/Pose switch is located at the top-left of the main view.
Rest mode
In Rest mode:
- the Animation panel is hidden
- changes made to object inputs are applied globally
- modified values become the new rest values for the project
This mode is typically used to set up your scene, objects, and default transforms before animating.
Pose mode
In Pose mode:
- the Animation panel becomes visible
- changes made to object inputs affect only the current animation
- the rest values are not overwritten
This allows you to animate properties while keeping a stable default state.
Because rest values are preserved, any animated property can always be reset back to its rest value using the Reset button on the input (see Inputs).
Apply pose to rest
While in Pose mode, you can apply the current pose values to the rest state, and vice versa.
To do this, open the menu (reset button) next to the Rest/Pose switch and select the appropriate action.
This is useful when you want to turn the current pose into the new default state, or when you want to reapply the default state to the current pose.
Animation panel
The Animation panel is the main tool for creating and editing keyframe animations.
It allows you to:
- create and organize object tracks
- add and edit keyframes
- preview motion over time
The Animation panel is only visible in Pose mode.
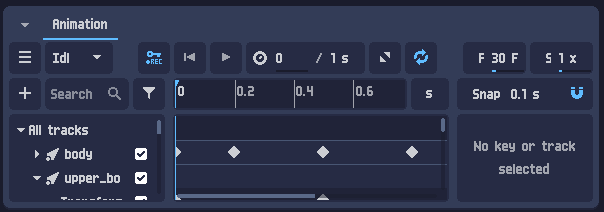
Main bar
The main bar contains the most common animation controls.
Left section (animation selection)
Use the buttons on the left to manage the currently active animation.
Middle section (recording and playback)
- Rec: when enabled, changing a property that already has a track will automatically create a keyframe at the current position.
- Rewind: moves the animation cursor to the start of the animation.
- Play / Pause: starts or stops playback.
- Jump to previous/next keyframe: moves the animation cursor to the previous/next keyframe of the selected tracks.
- Loop: restarts the animation automatically after reaching the end.
Right section (time and scaling)
- Current position: sets the current playback/editing position.
- Length: sets the total duration of the animation.
- Scale: changes the animation length while proportionally rescaling keyframe positions.
Object tracks
Animations are built from tracks.
A track represents an object and the properties being animated for that object.
Tracks can be created for most objects, including 2D and 3D objects, bones, and other animatable elements.
Creating tracks
You can create tracks in multiple ways:
- Click the Add button in the Animation panel
(multiple objects can be selected, and multiple properties can be added at once) - Click the Key icon next to a property input (see Inputs)
This automatically creates the required track and adds a key at the current time.
Track tools
Tracks support common operations such as:
- enabling/disabling
- copy/paste
Use the Filter button to display only the tracks related to the currently selected objects in the scene.
Timeline and cursor
The timeline controls time navigation and keyframe placement.
- Click and drag the cursor to move the current time.
- Use Snap to align the cursor to a specific time step.
- Scroll on the timeline to zoom in/out.
The timeline can be displayed in seconds or frames. This is controlled by the animation properties.
Keyframes
Keyframes store the value of a property at a specific time (frame).
When you change a value in Pose mode, you can add a keyframe to record it into the animation.
Creating keyframes
Keyframes can be created in several ways:
- Click the Key button next to an animatable input (see Inputs)
- Double-click on a track
- Right-click on a track and select Add key
- Enable Rec to automatically create keys when tracked values change
Editing keyframes
Keyframes can be:
- multi-selected
- duplicated (duplicates are placed at the current cursor position, keeping the same timing offsets)
- moved in time
Multi-selecting keyframes creates an advanced selection area that can be moved or resized.
A right-click menu is also available to flip the selection.
Selected properties
This panel displays properties for the current selection.
Track properties
When a track is selected, you can edit options such as:
- Step: minimum value step used when editing keys
(example: with a step of0.1, a value like50.06becomes50.1) - Wrap: interpolates between the last and first key to create a seamless loop
- Modulo: bounds values using a modulo
(example: with modulo360, a value like410becomes50)
Key properties
When keyframes are selected, you can edit:
- time/frame
- value
- easing function
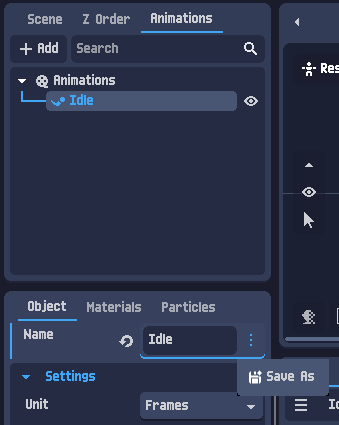
Managing animations
Animations are listed and managed from the Animations panel.

Selecting animations
Animations can be selected like objects:
- click to select one animation
- use
Shift/Ctrlto select multiple animations
When one or more animations are selected, their properties can be edited.
Displayed animation
Each animation has an eye icon.
The eye icon indicates which animation is currently displayed in the Animation panel and edited in Pose mode.
Editing animation properties
Animation properties can be modified:
- by selecting the animation(s)
- from the menu (hamburger button) in the Animations panel
This includes operations such as:
- renaming animations
- editing properties such as length and FPS
- saving animations (see the next section)
Saving and loading animations
PixelOver animations can be saved and loaded to reuse them across projects.
Save an animation or folder
When managing an animation or an animation folder, use the menu (three dots) next to the name input to access the Save option.
Load animations
Saved animation files use the .poanimation extension.
They can be opened like any other file.
When opened, an Import animations window will appear.
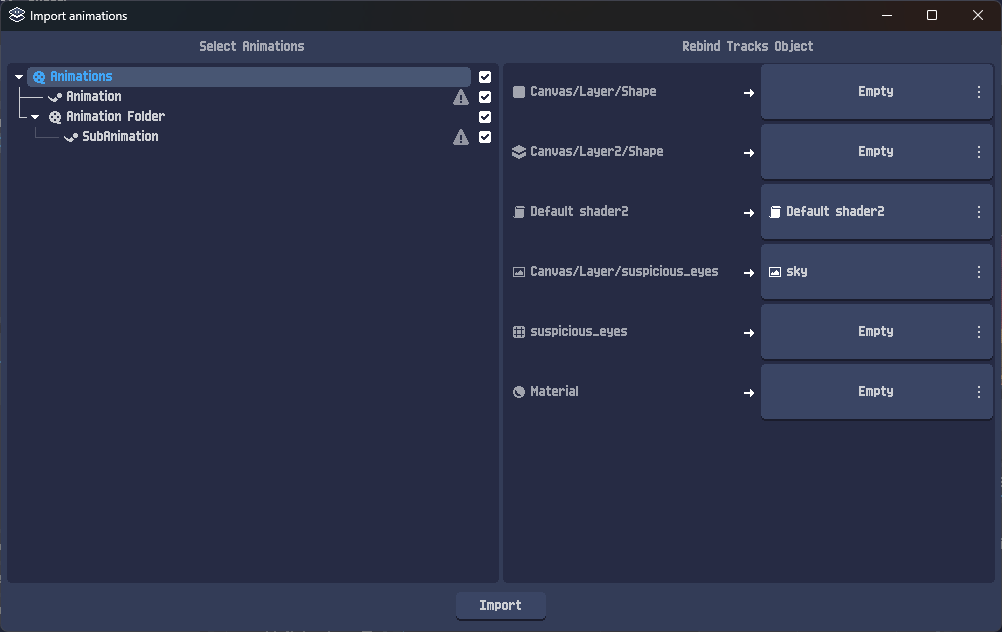
In this window, you can choose which animation folders and animations should be imported.
When selecting animations, the right panel displays the track list and allows you to rebind tracks by choosing which objects in the current project should be assigned to them.